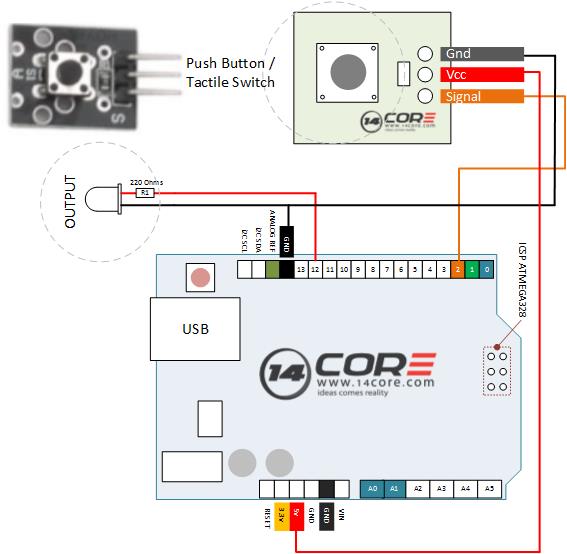
Switch are standard input to any electronic projects. Tactile switch works well in a PCB also can be used on a solderless breadboard. Switch are normally open or disconnected and when the push button is pressed are momentarily closed. Tactile switch are everywhere and they are especially popular in DIY electronics and microcontroller boards because they are well suited to act as a boot option or reset switch. Particularly, momentary switches are switches that don’t save their state you depress the switch. Below are the illustration that covers the purpose of the switch together with the microcontroller.
Interrupts are very useful feature in the microprocessor. Interrupts allows you to run a program while still being able to react to asynchronous input externally. Example below will demonstrate the uses of interrupt together with denouncing.
Tactile switch / Push Button generates open/close transition when pressed, due to a mechanical issue: these transitions may read a multiple press in a very short time. Without debouncing, pressing the push button once may generate an unpredictable results or noise. As you can see the code below its uses milis() function to keep track the time passed since the push button was pressed.
Required Components
- Arduino, MEGA, UNO, DUE, NANO, PRO, AVR
- Push Button Module / Tactile Switch / Push Button / Momentary Push Button
- 10 k Resistor
- Jumper Wires
- Solder-less Bread Board
Wiring Diagram Push Button Manual

Wiring Diagram using the Push Button Module
Source Code / Sketch Code
|
1 2 3 4 5 6 7 8 9 10 11 12 13 14 15 16 17 18 19 20 21 22 23 24 25 26 27 28 29 30 31 32 33 34 35 36 37 38 39 |
/* 14CORE Test Code for: HAll EFFECT SENSOR .:+osysso++:` `+yhs/-` `-+s+` `:/+++++++++` .:/++ooo++/-` .ooooooooooo+: :///////////- `odh/` `:y+` /ddhsooooooo+ /hddhsooooydddh sdddoooooosdddy` `////////////` -hds` `sy. +ddy` .ddd: sddy.dddo +ddd- .-----------` `hds :sssss/ -ossssso-yy` `hdd: oddy `ddd/oddd:......+dddo .++++++++++++ +dd` :sdddh` :ydddddddo +y/ .ddd+........ `hddy:.....:yddy.hdddddddddddy+. ```````````` ydy .hddd/+hdddhydddh/.+yo /hdddddddddd. :shddddddddhs/`+ddd:````-yddy- :ooooooooooo+ odh` sdddooyyyyyhddddyy.sy+ ` `......... ``.... ....` ```...` ` `` `` ` -dd+`::::` .:::- /yy. -oos+:-oos+--oos+: /o `+y o/: o:+/ h:`yos /+-`/+/+ s:y/y. /dd/ `+yy: +//+ +/:+ +/:+ -. `/ -:o.:/:`//+- + +:- :`-+:`://: +`o`+. -yds. `/yys- .`-.. .``` ```` .`` ` ` ``` ``-..` ` :ydy/.`````.-/oyhs: `+++oo+oo+:.+-++/-/ooo+o +:o/oo///:+/ .:oyhhhhhhhso:` `. ``` */ int LedOutput = 12;// Define as LED Output Pin 12 you can change this to 13 if you dont what pin 12 as output indictor int SensorPin = 2; // Define as Sensor Pin Input int Value;// Define as variable void setup() { pinMode(LedOutput,OUTPUT);//Set as LED output pinMode(SensorPin,INPUT);//Set as photo interrupter sensor output interface } void loop() { Value=digitalRead(SensorPin);// Set as sensor read SensorPin if(Value==HIGH) //If value is equal to HIGH estate then turn LED output = high { digitalWrite(LedOutput,HIGH); // Set ledoutput to HIGH or ON } else { digitalWrite(LedOutput,LOW); // Set landoutput to LOW or OFF } } |
Source Code / Sketch Code for Debounce & Interrupt
The code below will demonstration how to use debounce on the Arduino micro-controller using push button. When button press it will stay HIGH State if press again it will stay at LOW State.
|
1 2 3 4 5 6 7 8 9 10 11 12 13 14 15 16 17 18 19 20 21 22 23 24 25 26 27 28 29 30 31 32 33 34 35 36 37 38 39 40 41 42 43 44 45 46 47 48 |
/* 14CORE Test Code for: Debounce with Push Button .:+osysso++:` `+yhs/-` `-+s+` `:/+++++++++` .:/++ooo++/-` .ooooooooooo+: :///////////- `odh/` `:y+` /ddhsooooooo+ /hddhsooooydddh sdddoooooosdddy` `////////////` -hds` `sy. +ddy` .ddd: sddy.dddo +ddd- .-----------` `hds :sssss/ -ossssso-yy` `hdd: oddy `ddd/oddd:......+dddo .++++++++++++ +dd` :sdddh` :ydddddddo +y/ .ddd+........ `hddy:.....:yddy.hdddddddddddy+. ```````````` ydy .hddd/+hdddhydddh/.+yo /hdddddddddd. :shddddddddhs/`+ddd:````-yddy- :ooooooooooo+ odh` sdddooyyyyyhddddyy.sy+ ` `......... ``.... ....` ```...` ` `` `` ` -dd+`::::` .:::- /yy. -oos+:-oos+--oos+: /o `+y o/: o:+/ h:`yos /+-`/+/+ s:y/y. /dd/ `+yy: +//+ +/:+ +/:+ -. `/ -:o.:/:`//+- + +:- :`-+:`://: +`o`+. -yds. `/yys- .`-.. .``` ```` .`` ` ` ``` ``-..` ` :ydy/.`````.-/oyhs: `+++oo+oo+:.+-++/-/ooo+o +:o/oo///:+/ .:oyhhhhhhhso:` `. ``` */ int inPin = 2; int outPin = 12; int state = HIGH; int reading; int previous = LOW; long time = 0; long debounce = 200; void setup(){ pinMode(inPin, INPUT); pinMode(outPin, OUTPUT); } void loop(){ switchOn(); } void switchOn(){ reading = digitalRead(inPin); if (reading == 1 && Previous == 0 && millis() - time > debounce){ if (state == 1) state = 0; else state = 1; time = millis(); } digitalWrite(outPin, state); previous = reading; } |


