
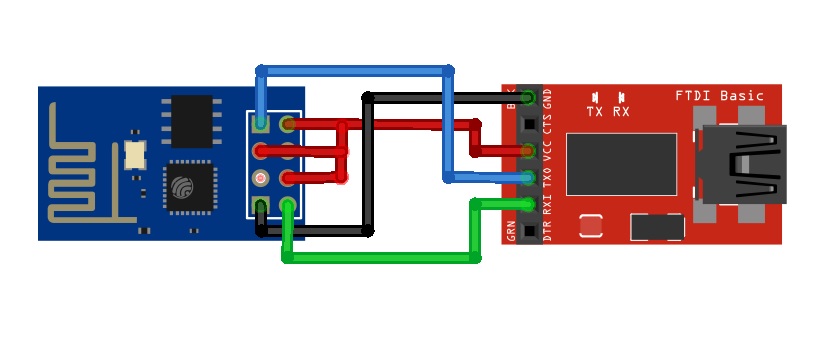
To upload a code to ESP8266, you should connect your ESP8266 to your FTDI USB Programmer: as the image illustration below.
Coding Your fist LUA Script a blinking an LED
|
1 2 3 4 5 6 7 8 9 10 11 12 13 14 |
-- your first lua script working on LED lighton=0 pin=4 gpio.mode(pin,gpio.OUTPUT) -- Assign GPIO to Output tmr.alarm(1,2000,1,function() if lighton==0 then lighton=1 gpio.write(pin,gpio.HIGH) -- Assign GPIO On else lighton=0 gpio.write(pin,gpio.LOW) -- Assign GPIO off end end) |
Burning your code into the chip

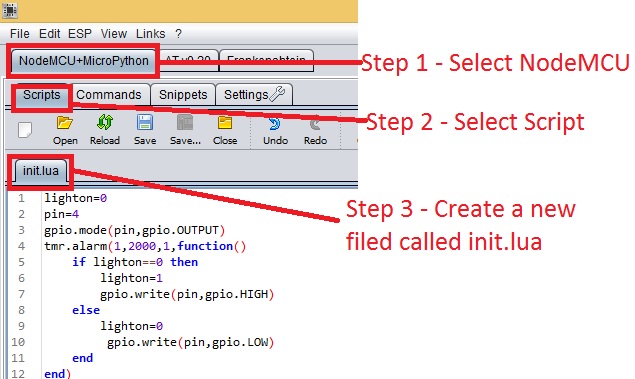
ESP8266 + FTDI Programmer connected to your computer, go to the ESPlorer IDE:
At the top right cornet of ESPlorer IDE follow the steps below:
- Click the Refresh button
- Select the COM(Communication) port for your FTDI programmer
- choose your baud rate (Commonly used 9600)
- Click Open

- Select NodeMCU
- Open a Scripts
- Create a new filled called [“14core-testcode.lua”]
Copy your Lua script (which you created in the previous section) to the IDE code section.

Save your code to your ESP8266 at the left bottom corner [ Save to ESP] in the output window you should see exactly command are being sent to ESP8266.

Note: If your want to delete your code, you can simply type file.remove (“14core-testcode.lua”) and press the button [SEND]. or you can type the command file.format() to delete all the files save in ESP8266 Chip.
If your done burning your code to ESP8266 you can now unplug ESP8266 board from your computer then you supply a 3.3v to the ESP8266 board itself as the schematics below.

Download the source code here | ESPXX LED CODE LUA SCRIPT
Download ESPlorer IDE | Download


I’m getting an error while doing this process.
Green button IDLE turns to busy. And can’t detect the frimware, timeout.
what is solution for this.
I have pressed Refresh so many times but COM port does not appear !!
when typing ls /dev/tty* in terminal it comes out
could anyone give an explanation ?
regards
why is there two two view on esp buttons and why are there two save and compile buttons?????? also what is the diff between upload and save and send to buttons,realy confusing .
this is wrong !! connect gpio0 to ground not vcc to enable flashing !
Pingback:برنامه نویسیESP8266با ESPlorer به زبان LUA - میکرو کنترلر | پروژه های میکرو و اندروید