In this illustration we will going to wire the ATTINY85 to control the OLED Screen using i2C Bus on ATTINY85 Microcontroller, I will just give an introduction what is ATTNY85 Microcontroller. The ATTINY 25,45, and 85 is a low power CMOS 8 bit microcontroller base on AVR enhance RSICK architecture by executing powerful instruction in a single clock cycle the ATTINYXX achieves throughputs approaching 1 MIPS per MHz allowing you to optimize the power consumption v/s processing speed. See below block diagram or you can just download the datasheet located below.
The AVR core combines a rich instructions set with 32 general purpose working registers all 32 register are directly connected to the Arithmetic Logic Unit or ALU, allowing the two independent registers to be accessed in one single instruction executed in one clock cycle. The resulting architecture is more code efficient while achieving throughputs up to ten times faster than conventional CISC microcontrollers.
The ATTINYXX provides you of 2, 4, 8 byres of In-System Programmable Flash, 128, 256, 512 bytes EEPROM, 128/256/256 bytes of SRAM, 6 IO lines, 32 working registers, 1 8bit timer/counter with compare modes, 1 8bit high speed timer/counter, USB, internal and external interrupts, 4 channel, 10-bit ADC, programmable watchdog timer with internal Oscillator, and 3 software selectable power saving modes. IDLE mode stops the CPU while allowing the SRAM, timer/counter, tents, disabling all chip functions until the next interrupt system to continue functioning. Power-down mode save the register contents, disabling all chip function until the next interrupt or hardware rest, ADC noise reduction mode stop the CPU and all I/O modules except ADC to minimize switching noise during ADC conversions.
The ATTINYXX is manufactured using ATMEL high density non-volatile memory technology. The One-Chip SPI flash allows you to program the memory to be re-programmed in system through an SPI serial interface, by a conventional non-volatile memory programmer or by on-chip boot code running on the AVR core. The ATTINY supported mostly commonly used program development tools including C, Micro Assembler, Program Debugger/Simulator and Evaluation Kits.
Digispark ATTINY Arduino IDE Integration with Windows Operating System
Copy this URL for additional board > http://digistump.com/package_digistump_index.json

DigiSpark ATTINY85 Pin Out Diagram

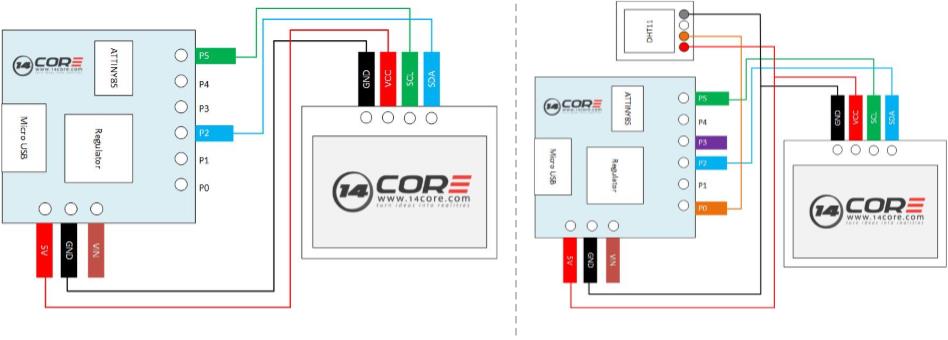
Wiring Diagram OLED 096″ Screen i2C / SPI /
Wiring with DHTXX Weather Station with ATTINY85
Sketch Code for Driving OLED Screen
Sketch Code Driving DHT11 and OLED
Downloads
Download ATTINY 25/45/85 Data Sheet | Pdf
Download Code Library ATTINY 85 | Zip
Download ATTINY85 Arduino Boot Loader| Zip
Download DigiUSB DigiSpark Board Windows Driver | Zip


Tack så mycket. koden testades.
Arduino: 1.8.2 (Windows 10), Board: “Digispark (Default – 16.5mhz)”
C:\Users\Summit\Downloads\ATTINY85-OLED\ATTiny85_OLED_weather_demo\ATTiny85_OLED_weather_demo.ino: In function ‘void setup()’:
ATTiny85_OLED_weather_demo:16: error: ‘DelayMs’ was not declared in this scope
DelayMs(40);
^
ATTiny85_OLED_weather_demo:17: error: ‘SSD1306’ was not declared in this scope
SSD1306.ssd1306_init();
^
C:\Users\Summit\Downloads\ATTINY85-OLED\ATTiny85_OLED_weather_demo\ATTiny85_OLED_weather_demo.ino: In function ‘void texto(char*)’:
ATTiny85_OLED_weather_demo:20: error: ‘SSD1306’ was not declared in this scope
void texto(char* s) {SSD1306.ssd1306_string_font6x8(s);}
^
C:\Users\Summit\Downloads\ATTINY85-OLED\ATTiny85_OLED_weather_demo\ATTiny85_OLED_weather_demo.ino: In function ‘void textoG(int, int, char*)’:
ATTiny85_OLED_weather_demo:21: error: ‘SSD1306’ was not declared in this scope
void textoG(int pos_x, int pos_y, char* sG) {SSD1306.ssd1306_char_f8x16(pos_x, pos_y, sG);}
^
C:\Users\Summit\Downloads\ATTINY85-OLED\ATTiny85_OLED_weather_demo\ATTiny85_OLED_weather_demo.ino: In function ‘void pos(uint8_t, uint8_t)’:
ATTiny85_OLED_weather_demo:22: error: ‘SSD1306’ was not declared in this scope
void pos(uint8_t x, uint8_t y){SSD1306.ssd1306_setpos(x, y);}
^
C:\Users\Summit\Downloads\ATTINY85-OLED\ATTiny85_OLED_weather_demo\ATTiny85_OLED_weather_demo.ino: In function ‘void DisMan()’:
ATTiny85_OLED_weather_demo:23: error: ‘SSD1306’ was not declared in this scope
void DisMan(){uint8_t p = 0xff; for (uint8_t i = 0; i > i); SSD1306.ssd1306_fillscreen(~p); DelayMs(100);}SSD1306.ssd1306_fillscreen(0x00);}
^
ATTiny85_OLED_weather_demo:23: error: ‘DelayMs’ was not declared in this scope
void DisMan(){uint8_t p = 0xff; for (uint8_t i = 0; i > i); SSD1306.ssd1306_fillscreen(~p); DelayMs(100);}SSD1306.ssd1306_fillscreen(0x00);}
^
ATTiny85_OLED_weather_demo:23: error: ‘SSD1306’ was not declared in this scope
void DisMan(){uint8_t p = 0xff; for (uint8_t i = 0; i > i); SSD1306.ssd1306_fillscreen(~p); DelayMs(100);}SSD1306.ssd1306_fillscreen(0x00);}
^
C:\Users\Summit\Downloads\ATTINY85-OLED\ATTiny85_OLED_weather_demo\ATTiny85_OLED_weather_demo.ino: In function ‘void loop()’:
ATTiny85_OLED_weather_demo:42: error: ‘DelayMs’ was not declared in this scope
DelayMs(3000);
^
exit status 1
‘DelayMs’ was not declared in this scope
This report would have more information with
“Show verbose output during compilation”
option enabled in File -> Preferences.
PLEASE HEEEELP!
I have the same problem: ‘DelayMs’ was not declared in this scope
Arduino:1.8.2 (Windows 7), Tarjeta:”Digispark (Default – 16.5mhz)”
C:\Users\Alvaro!\Documents\Arduino\ATTINY85-OLED (1)\ATTiny85_OLED_weather_demo\ATTiny85_OLED_weather_demo.ino: In function ‘void setup()’:
ATTiny85_OLED_weather_demo:15: error: ‘DelayMs’ was not declared in this scope
DelayMs(40);
^
ATTiny85_OLED_weather_demo:16: error: ‘SSD1306’ was not declared in this scope
SSD1306.ssd1306_init();
^
C:\Users\Alvaro!\Documents\Arduino\ATTINY85-OLED (1)\ATTiny85_OLED_weather_demo\ATTiny85_OLED_weather_demo.ino: In function ‘void texto(char*)’:
ATTiny85_OLED_weather_demo:19: error: ‘SSD1306’ was not declared in this scope
void texto(char* s) {SSD1306.ssd1306_string_font6x8(s);}
^
C:\Users\Alvaro!\Documents\Arduino\ATTINY85-OLED (1)\ATTiny85_OLED_weather_demo\ATTiny85_OLED_weather_demo.ino: In function ‘void textoG(int, int, char*)’:
ATTiny85_OLED_weather_demo:20: error: ‘SSD1306’ was not declared in this scope
void textoG(int pos_x, int pos_y, char* sG) {SSD1306.ssd1306_char_f8x16(pos_x, pos_y, sG);}
^
C:\Users\Alvaro!\Documents\Arduino\ATTINY85-OLED (1)\ATTiny85_OLED_weather_demo\ATTiny85_OLED_weather_demo.ino: In function ‘void pos(uint8_t, uint8_t)’:
ATTiny85_OLED_weather_demo:21: error: ‘SSD1306’ was not declared in this scope
void pos(uint8_t x, uint8_t y){SSD1306.ssd1306_setpos(x, y);}
^
C:\Users\Alvaro!\Documents\Arduino\ATTINY85-OLED (1)\ATTiny85_OLED_weather_demo\ATTiny85_OLED_weather_demo.ino: In function ‘void DisMan()’:
ATTiny85_OLED_weather_demo:22: error: ‘SSD1306’ was not declared in this scope
void DisMan(){uint8_t p = 0xff; for (uint8_t i = 0; i > i); SSD1306.ssd1306_fillscreen(~p); DelayMs(100);}SSD1306.ssd1306_fillscreen(0x00);}
^
ATTiny85_OLED_weather_demo:22: error: ‘DelayMs’ was not declared in this scope
void DisMan(){uint8_t p = 0xff; for (uint8_t i = 0; i > i); SSD1306.ssd1306_fillscreen(~p); DelayMs(100);}SSD1306.ssd1306_fillscreen(0x00);}
^
ATTiny85_OLED_weather_demo:22: error: ‘SSD1306’ was not declared in this scope
void DisMan(){uint8_t p = 0xff; for (uint8_t i = 0; i > i); SSD1306.ssd1306_fillscreen(~p); DelayMs(100);}SSD1306.ssd1306_fillscreen(0x00);}
^
C:\Users\Alvaro!\Documents\Arduino\ATTINY85-OLED (1)\ATTiny85_OLED_weather_demo\ATTiny85_OLED_weather_demo.ino: In function ‘void loop()’:
ATTiny85_OLED_weather_demo:41: error: ‘DelayMs’ was not declared in this scope
DelayMs(3000);
^
Se encontraron múltiples librerías para “font6x8.h”
Usado: C:\Users\Alvaro!\Documents\Arduino\libraries\ATTINY85-OLED
No usado: C:\Users\Alvaro!\AppData\Local\Arduino15\packages\digistump\hardware\avr\1.6.7\libraries\DigisparkOLED
No usado: C:\Users\Alvaro!\AppData\Local\Arduino15\packages\digistump\hardware\avr\1.6.7\libraries\DigisparkOLED
No usado: C:\Users\Alvaro!\AppData\Local\Arduino15\packages\digistump\hardware\avr\1.6.7\libraries\DigisparkOLED
No usado: C:\Users\Alvaro!\AppData\Local\Arduino15\packages\digistump\hardware\avr\1.6.7\libraries\DigisparkOLED
exit status 1
‘DelayMs’ was not declared in this scope
Your code doesn’t work
Check your c code libraries.
I don’t know why, but I beat this code into compliance… sort of. Here is what I did to resolve the errors listed above:
1. ‘DelayMs’ was not declared in this scope. Resolved by replacing ‘DelayMs’ with’ delay’ in all instances.
2. ‘SSD1306’ was not declared in this scope…SSD1306.ssd1306_init();
Resolved by removing all “SSD1306.” instances leaving the remainder (i.e. ssd1306_Init();)
3. restored lines 182-196 of ssd1306xled.cpp that had been previously commented out disabling the fillscreen function.
4. Commented out all code on the Weather_Demo tab due to the multiple declarations of variables. I think the intent was to use one of the first two tabs.
I hope this is of some help to others.
for me the wiring was wrong it was sda to p2 and scl to p0 but apart fromt hat really good guide, helped alot understanding the Digispark