In this tutorial we will making a traffic lights that will change from green to red via amber, after a set of time using the 4 state system. This project could be used on model railway, model road or model car, make a set of working traffic light for your DIY scaled town or building a road.

Electronic parts required.
- Arduino UNO/MEGA/NANO/PRO
- 3x LED ( Red, Green, Yellow)
- 3x 220 Ohms Resistor
- Jumper Wires
- Solder-less Breadboard
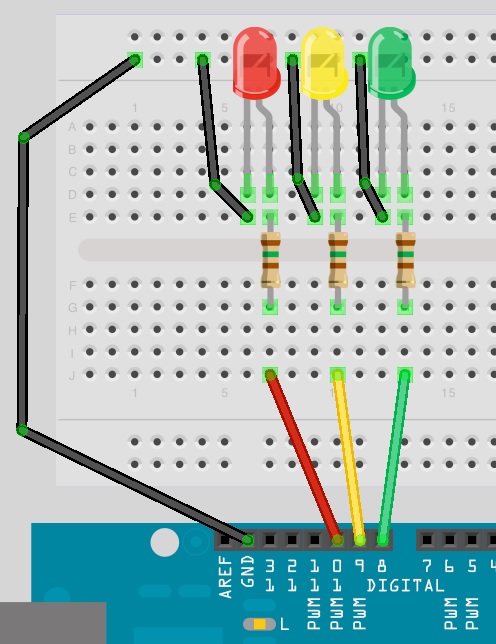
Wiring the LED to Arduino
As you can see below we have to connect 3 LED’s with the Anode of each one going to digital Pings 8,9 and 10, via a 220 Ohms resistor on each LED. Jumper wires a place from ground to the ground rail at the top of the breadboard and a ground wire goes from the cathode led of each LED going to the common ground rail.
Sketch Code
|
1 2 3 4 5 6 7 8 9 10 11 12 13 14 15 16 17 18 19 20 21 22 23 24 25 26 27 28 29 30 31 32 33 34 35 |
/* 14CORE LED Traffic Light for 14core starter kit */ int ledDelay = 10000; // Delay timer for 10 Seconds int redPin = 10; // define the 10 for red led (STOP) int yellowPin = 9; // define the 9 for yellow (READY) int greenPin = 8; // define the 8 for green (GO) void setup() { pinMode(redPin, OUTPUT); // call redPin pin 10 as output pinMode(yellowPin, OUTPUT); // call yellowpin pin 9 as ouput pinMode(greenPin, OUTPUT); // call greenPin pin 8 as ouput } void loop() { digitalWrite(redPin, HIGH); // turn the red light on delay(ledDelay); // wait 5 seconds digitalWrite(yellowPin, HIGH); // Turn yellow LED ON/HIGH delay(2000); // Delay wait 2 seconds digitalWrite(greenPin, HIGH); // Turn LED green on/HIGH digitalWrite(redPin, LOW); // Turn LED red off/LOW digitalWrite(yellowPin, LOW); // Turn LED yellow off/LOW delay(ledDelay); // Delay wait 10 seconds digitalWrite(yellowPin, HIGH); // Turn LED yellow on/HIGH digitalWrite(greenPin, LOW); // Turn LED green off/LOW delay(2000); // wait 2 seconds digitalWrite(yellowPin, LOW); // Turn LED yellow off/LOW // loop repeats } |
Making a LED Traffic Light with Arduino


