Here is another 14CORE guide working with ESP32-S CAM that runs with ESP-WHO Library. ESP-WHO is a face detection and recognition customize code for ESPRESSIF System Chip and coded and optimize that suits for the ESP32 chip with the help of image utility that offer a fundamental image processing APIs that detects an image input and provide the positions and facial recognition. Please refer to this link for more details.
The OV2640 Camera Chip Sensor
The OV2640 is the popular camera chip and first ¼ inch 2MP camera sensor distributed across the world way back 2003. The OV260 is a fully integrated camera chip built on Omni Visions 2.2-micron OmniPixel2 architecture and easy been assembled in the 8×8 mm sockets. This camera chip is integrated with compression engine that suitable for small- or large-scale projects like embedded systems, object detections, toys, facial and recognitions, etc. for more readings please refer to the datasheet below.
The ESP32S Module
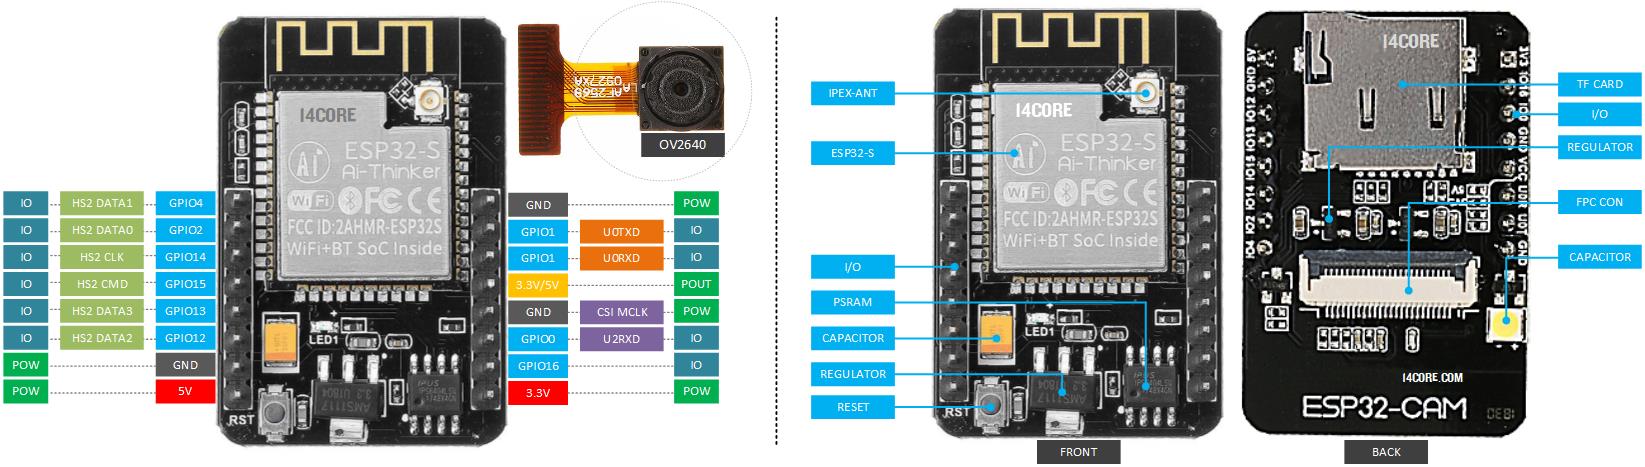
ESP32S Wifi Bluetooth combo module is an ultra-performance that is high ultra-low-power consumption Wi-Fi and Bluetooth wireless platform based on ESPRESSIF ESP32 chipset. ESP-32S dual-core 448 KByte ROM | 520 KByte SRAM | 16 KByte SRAM in RTC | 802.11 b/g/n/e/I Wi-Fi | Bluetooth v4.2 BR | EDR & BLE | clocks & Times |peripheral Interfaces and security mechanism.
ESP-32S Wifi Bluetooth combo module provides SDK Firmware for fast programming that is on-line open source toolchains based on GCC for development support. It is designed for, loggers, video steaming for camera, Wi-Fi & Bluetooth enabled devices, Home automation, mesh network applications, wireless music system, face recognition’s, etc. This chip has a single GHz Wi-Fi and Bluetooth combo chip designed with TSMC ultra-low-power 40 nm technology. It is designed and optimized for the powerful performance that is best, RF performance, robustness, versatility, features, and reliability, for a wide variety of applications, and different power profiles.
ESP32 is the most solution that is integrated Wi-Fi + Bluetooth applications in the industry with less than 10 external components. ESP32 integrates the antenna switch, RF balun, power amplifier, low noise receives amplifier, filters, and power management modules. As such, the solution is the entire minimal Printed Circuit Board (PCB) area. ESP32 is designed for mobile, wearable electronics, and Internet of Things (IoT) applications and it has many features of the state-of-the-art low power chip, including fine resolution clock gating, power modes, and dynamic power scaling.
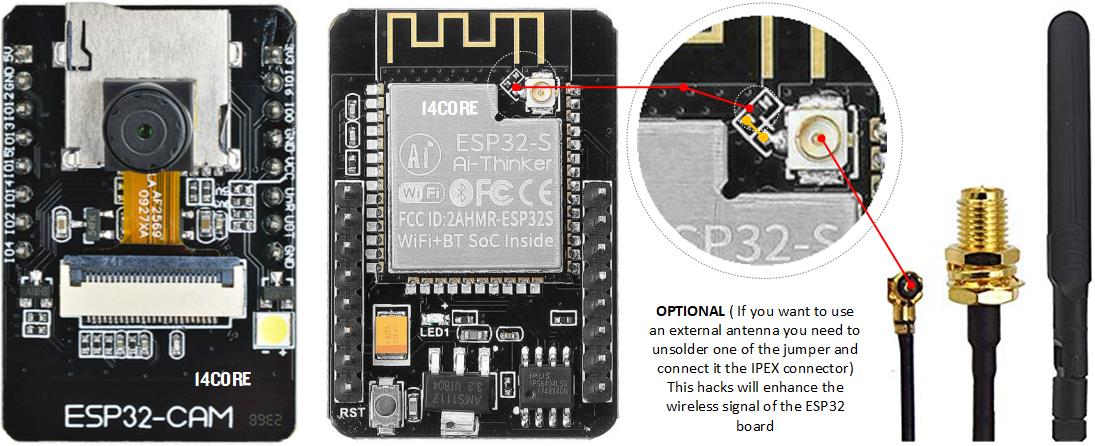
Boosting the Wifi Signal
Some ESP32 Board has an issues with the signals strength or poor signal, most of this problem is the ESP32 board it uses the ESP32 module antenna, instead connecting to IPEX external antenna, in this case you need to unsolder the jumper and connect to the IPEX antenna. see below the illustration.
IDE Integration
Here is the guide how to integrate your ESP32 Board to work with Arduino IDE, just make it sure your are connected to the internet to do this process.
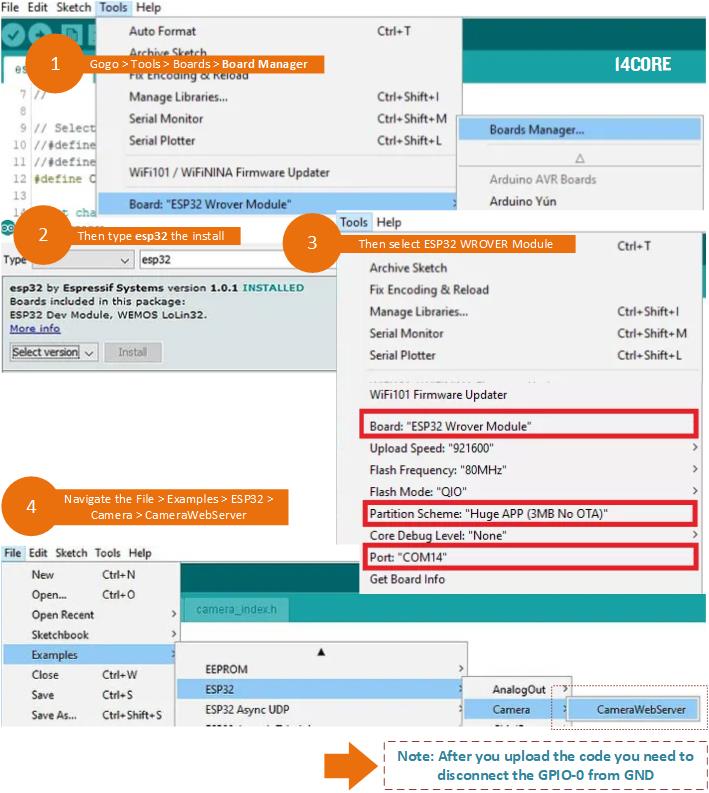
The Development Environment
Before we can program the ESP32 we to get the Toolchain Compile Code & Build tools such as CMAKE to build an application to work with ESP32 and ESP-WHO that it has an API for ESP32 along with scripts to run the Toolchain. Below are the step by step guide to setup your development environment.
Requirements
- PC / MAC / LINUX
- ESP32-s CAM
- ToolChain (Get it From Here)
- Build tools CMake | MSYS2
- Git Bash Terminal
- ESP-IDF / ESP-WHO neural networks
- and your favorite code editor (Eclipse / Atom / Visual Studio Code / Bracket) etc.
First step is you need to get the required tools such as Toolchain ( for Windows / Mac / Linux ) & for this demonstration we will use Windows OS with MSYS2 if you want to CMAKE just follow this link. the easiest way to isntall the ESP-IDF is to use ESP-IDF Tools installer you can get it from here. next is you need to install also the Git Bash Terminal to use git command in our terminal or use the graphical interface Github Desktop. if you have already installed MSYS2 from previous ESP-IDF then you can also use the MSYS terminal. navigate to C:\msys32\mingw32.exe to run the application.
- Extract windows_install_prerequisites.zip and Copy this file to C:/msys32/windows_install_prerequisites.sh
- Close the terminal windows and navigate again to C:\msys32\mingw32.exe double click the file to reopen the terminal then type the windows_install_prerequisites.sh and press enter.
- Create a directory ESP32 by typing mkdir ESP32 on the terminal then navigate to ESP directory and type git clone –recursive https://github.com/espressif/esp-idf.git if you encounter and error just navigate again to c:/msys32/ and run the c:/msys32/autorebase.bat
- If you navigate to c:\msys32\home\**yourprofile**\esp32\ you will see the list of files API and Libraries for ESP32 copied
- Create a user profile script by navigating to C:\msys32\home\**yourprofile**\esp32\esp-idf\ create a new file with a file name export_idf_path.sh located in c:/msys32/etc/profile.d/ right-click this file and open it NotePad and add a following line of code to the new export_idf_path.sh by replacing the IDF_PATH with our own. export IDF_PATH=”C:/msys32/home/**yourprofile**/esp32/esp-idf” save and close the notepad & close the terminal.
- Open again the C:\msys32\mingw32.exe and type printenv IDF_PATH. copy phase C:/msys32/mingw32/bin/python.exe -m pip install –user -r C:/msys32/home/**yourprofile**/esp32/esp-idf/requirements.txt
Setting up the Face Detection & Recognition
- Open your terminal and navigate c:\msys32\mingw32.exe and type git clone –recursive https://github.com/espressif/esp-who.git and navigate to c:\msys32\home\**yourprofile**\esp-who\ to verify the ESP-WHO framework, libraries and example are installed.
- Now close the terminal and open again the c:\msys32\mingw32.exe and copy phase cd ~/esp-who/examples/single_chip/camera_web_server/
- next is type make menuconfig it will open a windows of settings then change what settings your preferred.
-
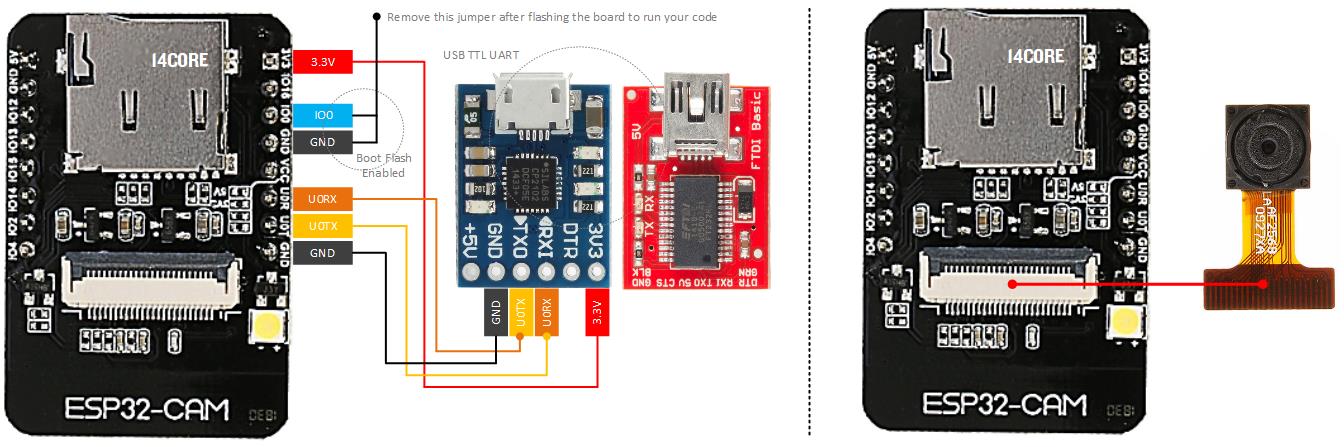
- Then save the settings then type make flash Note: if you encounter an error make it sure that the pin IO0 and GND is connected and check your COM port if it is properly configured and connected please see the diagram below.
- After the flashing you need to reset the ESP32 Board and open again the c:\msys32\mingw32.exe and type make monitor
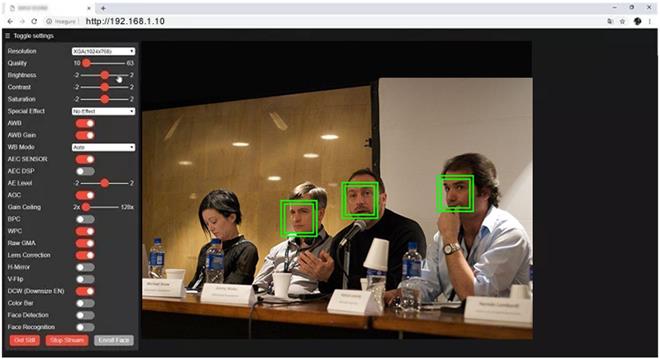
- then navigate to IP address shows on the serial monitor. open your browser type the ip address in my case it is http://192.168.1.10 / then you will see the same image below.
Downloads / Code Libraries & Reference
- ESP-WHO Code Library
- ESP-IDF Library
- ESPRESSIF system for the official guide on ESP32S Module Development Environment
- ESPRESSIF ESP32 Product Support
- ESP32 Module Technical Datasheet
- ESP32-S CAM Datasheet
- OV2640 Chip Sensor Camera Datasheet


:) nice, i’ve tested this with of CMAKE. thanks.
hi Admin, posible to make esp32-cam with esp32 AI Thinker like wroom32?
yes, just obtain the camera module. however most module is using Universal Asynchronous Receiver/Transmitter (UART), just verify the pinout.
here is the OV2640 Schematics for your reference.
hi Admin, posible to make esp32-cam with esp32 wroom32 without AI Thinker?
Pingback:Wiring Senserion SPS30 PM Optical Sensor with ATMEGA4809 AVR | 14core.com
Bom dia!
onde consigo a library soc.h e rtc_io.h
nos links a cima não tem!
Grato
IO! Claudio, :)
Basta seguir o link abaixo, você pode baixar o driver necessário….
RTC
https://www.14core.com/wp-content/uploads/2020/03/driver.zip
SOC
https://www.14core.com/wp-content/uploads/2020/03/soc.zip